 English
  简体中文 Chinese (Simplified)
 繁體中文 Chinese (Traditional)
WordPress Plugin Installation Guide
| We updated the WordPress plugin on November 8th, 2018. If you downloaded the plugin before this date, please Download the latest plugin. |
The following steps will show you how to install the BackLinks.com plugin on your WordPress blog. The download and instructions will work for both Standard Sidebar Links and Content Links.
The process is simple:
- Upload and Activate the Plugin
- Configure the Plugin
- Add the Standard Sidebar widget or insert the code manually
- Validate your Standard and/or Content Link page
1. Upload and Activate the Plugin
- Download plugin and unpack it into your /wp-content/plugins/ folder.
- Activate the BackLinks.com plugin in the Plugins section of your WordPress Admin panel.
2. Configure the Plugin
- In your WordPress Admin, click on Plugins in the side navigation.
- Click on "BackLinks Configuration".
-
Enter your BackLinks Key. To find your key, go to "My Standard Link Pages" (or "My Content Link Pages" if you are validating a Content Link Page). Find the link page and click on the "Installation Code" button. Select "WordPress" from the programming language, and click on the "Installation Guide" link. It will take you to the same page that you are on, but your BackLinks key will be displayed.
- Check the Other Options:
Open partner links in a new window - If checked, sidebar links will open in a new window.
Disable Auto Update Plugin - Check this box if you do not wish our system to automatically update the plugin.
Display links in the 'Widgets' block - This option allows you to drag and drop a widget into your sidebar to display the links instead of manually adding the link code.
Insert BackLinks code manually - Instead of using a widget, you may manually add the link code to your page.
- Click the "Update Options" button to save your changes.
3. Add the Standard Link Widget or Code
Once the plugin is installed, there are two ways to add the Standard Link code to your site. You can drag and drop a widget into your sidebar or add the code manually.
If you are planning on ONLY running Content Link Ads on this page, you do not need to add the code to the Sidebar. However, if you are running Standard Link Ads alone or both Standard and Content Link Ads, please add the code to the Sidebar.
OPTION 1: Display links in the 'Widgets' block (Recommended)
Follow these instructions if you selected "Display links in the 'Widgets' block" in the plugin configuration.
- In your WordPress Admin, click on the "Appearance" tab and go to "Widgets".
- Drag and drop the widget into your sidebar.
- Add a unique title for the widget like, "My Partners", "Recommended Sites", "Related Websites", etc.
- Save it and then go to your home page and make sure that the new section is displayed.
Note: There will not be any links listed until your page is validated and an Advertiser purchases a link.
OPTION 2: Insert BackLinks code manually
Follow these instructions if you selected "Insert BackLinks code manually" in the plugin configuration.
Note: The following PHP code will NOT work when added thru a text widget. If you wish to use a widget, select the "Display links in the 'Widgets' block" option in the your BackLinks.com configuration in your WordPress admin.
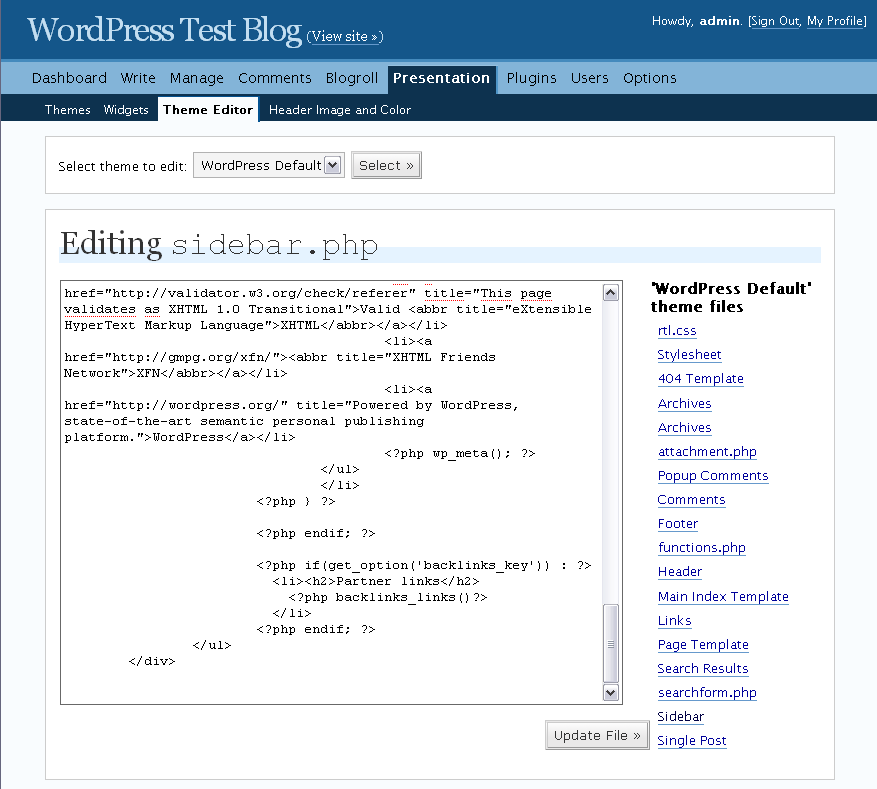
- Depending on your version of WordPress, navigate to:
WordPress Admin->Presentation->Theme editor->Sidebar
-or-
Wordpress Admin->Appearance->Editor->(Select "Sidebar (sidebar.php)" from list on right side of page
- Add the following code into Sidebar template of your WordPress theme.
Example:
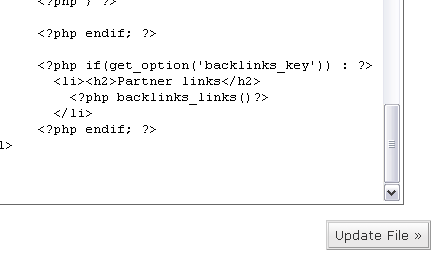
- Go to your home page and make sure that a "Partner Links" section is displayed.
Note: There will not be any links listed until your page is validated and an Advertiser purchases a link.
4. Validate Your Standard and/or Content Link Pages
After you have installed the plugin, return to your BackLinks.com control panel. Find the Standard and/or Content Link pages for which you just installed the plugin and click the "Validate Web Page!" link to make sure the code is installed properly.
If you have any questions regarding this WordPress pugin installation, please contact us.